Whilst there are plenty of videos explaining the basics streaming, few of them talk you through the basics of actually implementing a video player on your website. The principles taught in this hands-on Bitmovin webinar are transferable to many players, but importantly at the end of this talk you’ll have your own implementation of a video player which you can make in real time using their remix project at glitch.com which allows you to edit code and run it immediately in the browser to see your changes.
Ahead of the tutorial, the talk both explains the basics of compression and OTT led by Kieran Farr, Bitmovin’s VP of marketing and Andrea Fassina, Developer Evangelist. Andrea outlines a simplified OTT architecture where he looks at the ‘ingest’ stage which, in this example, is getting the videos from Instagram either via the API or manually. It then looks at the encoding step which compresses the input further and creates a range of different bitrates. Andrea explains that MPEG standards such as H.264, H.265 are commonly used to do this making the point that MPEG standards typically require royalty payments. This year, we are expecting to see VVC released by MPEG (H.266).
Andrea then explains the relationship between resolution, frame rate and file sizes. Clearly smaller files are better as they require less time to download leading to quicker downloads so faster startup times. Andrea discusses how the resolutions match the display resolutions with TVs having 1920×1080 resolution or 2160×3840 resolution. Given that higher resolutions have more picture detail, there is more information to be sent leading to larger file sizes.
Source: Bitmovin https://bit.ly/2VwStwC
When you come to set up your transcoder and player, there are a number of options you need to set. These are determined by these basics, so before launching into the code, Andrea looks further into the fundamental concepts. He next looks at video compression to explain the ways in which compression is achieved and the compromises within. Andrea starts from the first MJPEG codecs where each frame was its own JPEG image and they simply animated from one JPEG to another to show the video – not unlike animated GIFs used on the internet. However by treating each frame on its own ignores a lot of compression opportunity. When looking at one frame to the next, there are a lot of parts of the image which are the same or very similar. This allowed MPEG to step up their efforts and look across a number of frames to spot the similarities. This is typically referred to as temporal compression as is it uses time as part of the process.
In order to achieve this, MPEG splits all frames into blocks, squares in AVC, which are called macro blocks which be compared between frames. They then have 3 types of frame called ‘I’, ‘P’ and ‘B’ frames. The I frames have a complete description of that frame, similar to a JPEG photograph. P frames don’t have a complete description of the frame, rather they some blocks which have new information and some information saying that ‘this block is the same as this block in this other frame. B frames have no complete new image parts, but create the frame purely out of frames from the recent future and recent past; the B stands for ‘bi-directional’.
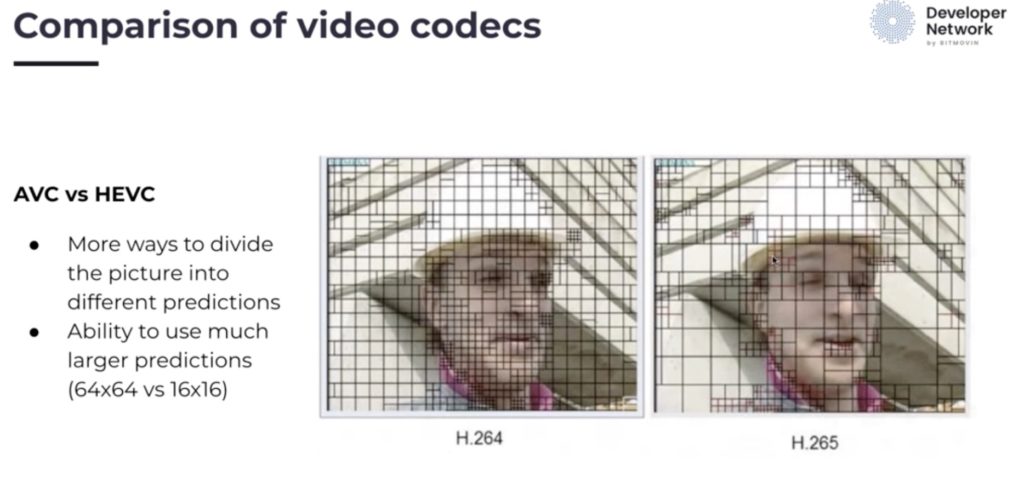
Ahead of launching into the code, we then look at the different video codecs available. He talks about AVC (discussed in detail here), HEVC (detailed in this talk) and compares the two. One difference is HEVC uses much more flexible macro block sizes. Whilst this increases computational complexity, it reduces the need to send redundant information so is an important part of the achieving the 50% bitrate reduction that HEVC typically shows over AVC. VP9 and AV1 complete the line-up as Andrea gives an overview of which platforms can support these different codecs.
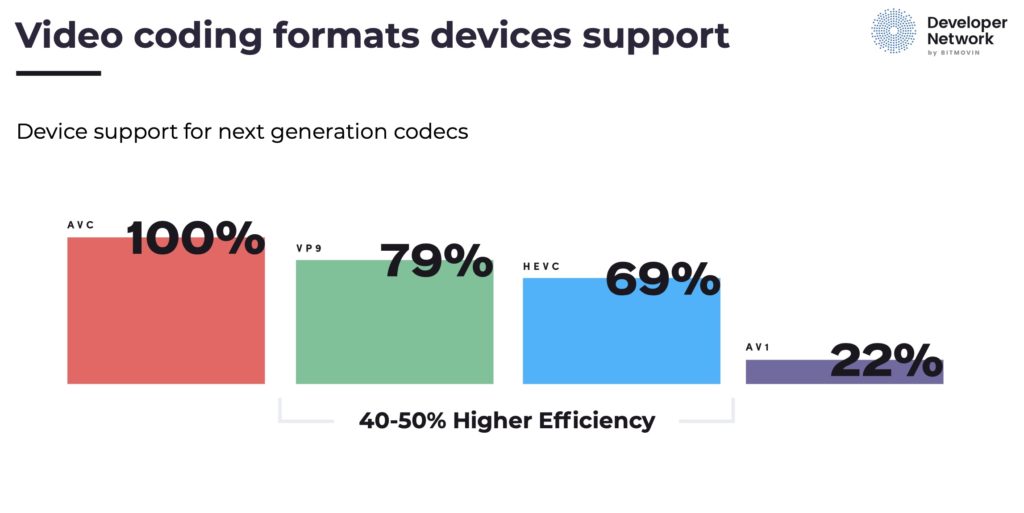
Source: Bitmovin https://bit.ly/2VwStwC
Andrea then introduces the topic of Adaptive bitrate, ABR. This is vital in the effective delivery of video to the home or mobile phones where bandwidth varies over time. It requires creating several different renditions of your content at various bitrates, resolutions and even frame rate. Whilst these multiple encodes put a computational burden on the transcode stage, it’s not acceptable to allow a viewer’s player to go black, so it’s important to keep the low bitrate version. However there is a lot of work which can go into optimising the number and range of bitrates you choose.
Lastly we look at container formats such as MP4 used in both HLS and MPEG-DASH and is based on the file format ISO BMFF. Streaming MP4 is usually called fragmented MP4 (fMP4) as it is split up into chunks. Similarly MPEG2 Transport Streams (TS files) can be used as a wrapper around video and audio codecs. Andrea explains how the TS file is built up and the video, audio and other data such as captions are multiplexed together.
The last half of the video is the hands-on section during which Andrea talks us through how to implement a video player in realtime on the glitch project allowing you to follow along and do the same edits, seeing the results in your browser as you go. He explains how to create a list of source files, get the player working and styled correctly.
Watch now!
Download the presentation
Speakers
 |
Kieran Farr
VP of Marketing,
Bitmovin
|
 |
Andrea Fassina
Developer Evangelist,
Bitmovin
|


